
In today’s fast-paced business environment, real-time data access and intelligent forecasting are no longer luxuries—they are necessities. Organizations rely on seamless data integration to consolidate financial and operational insights, while predictive analytics helps them anticipate future trends and make data-driven decisions. Without these capabilities, businesses struggle with delayed reporting, inaccurate forecasts, and inefficient planning.
This is where OneStream comes in—a powerful unified platform for financial planning, analysis, and forecasting. OneStream not only enables organizations to streamline data integration from multiple sources (such as ERPs, CRMs, and external databases) but also empowers them to leverage predictive analytics for more accurate budgeting, forecasting, and strategic decision-making.
In this blog, we will explore two critical processes that can maximize the value of OneStream:
- Setting up Direct Connections to integrate data sources efficiently.
- Configuring Predictive Analytics to unlock actionable insights from historical trends.
By the end of this guide, you’ll have a clear roadmap to seamlessly connect your data sources and harness the power of predictive analytics within OneStream. Let’s dive in!
Preparing for Direct Connection to OneStream
Why Direct Connections Matter
For organizations relying on real-time financial reporting and forecasting, seamless data integration between their ERP system and OneStream is crucial. A direct connection eliminates manual data transfers, reducing errors and improving efficiency. By integrating ERP data directly into OneStream, companies can:
- Ensure real-time data availability for analysis and reporting.
- Eliminate manual uploads and reduce the risk of human errors.
- Improve decision-making by providing up-to-date insights across business units.
Setting up a direct connection requires careful planning to ensure data accuracy, security, and system performance. Below are the essential steps to establish a reliable integration between your ERP system and OneStream.
Step 1: Create SQL Queries from ERP
Before connecting OneStream to your ERP, you first need to extract relevant data using SQL queries. This step ensures that OneStream only retrieves the necessary financial and operational data rather than pulling in unfiltered, unnecessary records.
Common tools for writing SQL queries:
- Oracle SQL Developer (for Oracle ERP)
- Microsoft SQL Server Management Studio (SSMS) (for Microsoft-based ERPs)
Best Practices for Querying ERP Data:
- Select only required fields (e.g., Sales, Expenses, GL Balances).
- Use filtering conditions to avoid unnecessary data load.
- Optimize queries for faster execution and minimal server load.
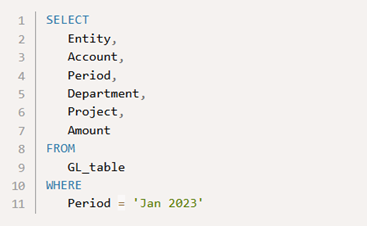
For example, the query might look like this:
The results of a query like this may produce a table similar to this:

Once the data is retrieved, it is crucial to validate it before integration. A simple way to do this is to export the query results into a CSV file and compare it with ERP-generated reports (like trial balances) to ensure the extracted data aligns with actual figures.
Step 2: Choose a Connection Method
OneStream supports multiple integration methods depending on your deployment (Cloud or On-Premise) and security requirements. Below are the most common options:
Named Connection (Cloud & On-Premise Deployments):
- Ideal for OneStream Cloud users (managed by OneStream Support).
- Requires providing ERP driver details and setup configurations.
- On-Premise users need to configure the Application Server Configuration file.
Smart Integration Connector (SIC) (Version 7.3+):
- Best for organizations wanting full control over data security.
- Runs on a dedicated virtual machine (VM) for secure ERP-to-OneStream communication.
- Allows users to manage login credentials instead of relying on OneStream Cloud.
REST API Connection:
- Ideal for real-time data integration via HTTPS-based APIs.
- Requires developing custom business rules to handle API requests.
- Best suited for dynamic, web-based systems that need frequent updates.
Choosing the right connection method depends on your ERP type, security needs, and whether your OneStream instance is Cloud-based or On-Premise.
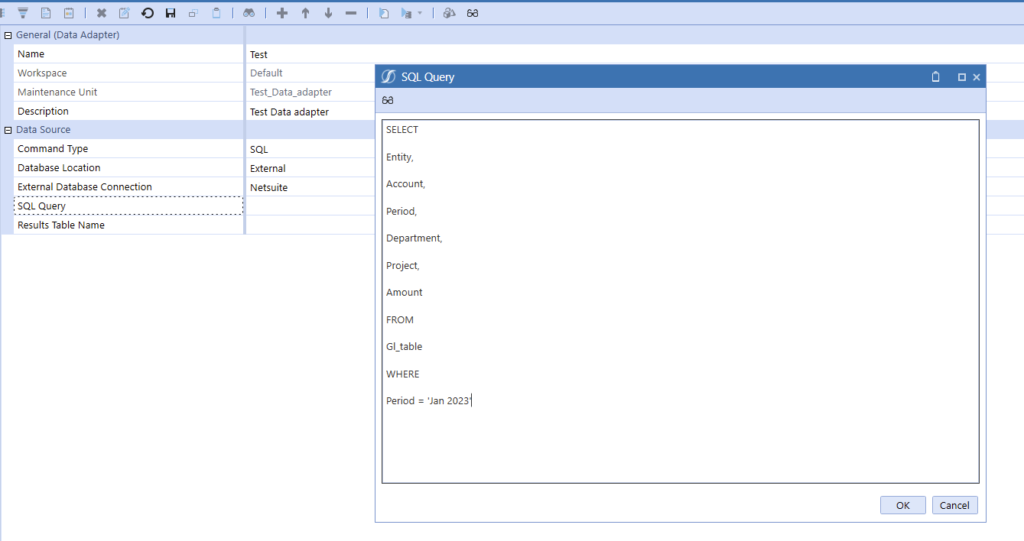
Step 3: Set Up a SQL Data Adapter
A SQL Data Adapter in OneStream extracts data from your ERP system for dashboards, reporting, or data exports. To set it up, first create a Dashboard Maintenance Unit in the Workspaces section (or Dashboards in earlier versions). Within this unit, create a Data Adapter, selecting your ERP connection (e.g., a Named Connection like "Netsuite").
Add your SQL query to the adapter, ensuring it retrieves only the necessary fields.
Run the adapter to check the output, then export the results and compare them with ERP reports (e.g., trial balances) to validate accuracy.
Next, create a Grid View component within the same Dashboard Maintenance Unit and link it to the SQL Data Adapter via the Data Adapter tab. Add the component to a new dashboard and confirm the data displays correctly.
Finally, export the data from the dashboard for comparison with the original ERP values. Once validated, you can proceed to use the adapter within a Connector Business Rule for automated data integration in OneStream.
Predictive Analytics
Why Predictive Analytics Matter
Predictive analytics enables businesses to forecast future trends and outcomes based on historical data, providing valuable insights that drive smarter decisions. By leveraging advanced models, companies can anticipate challenges, optimize operations, and seize opportunities, ensuring they stay competitive in a fast-evolving market. In platforms like OneStream, predictive analytics transforms data from a retrospective tool into a forward-looking strategy, helping businesses prepare for the future with confidence.
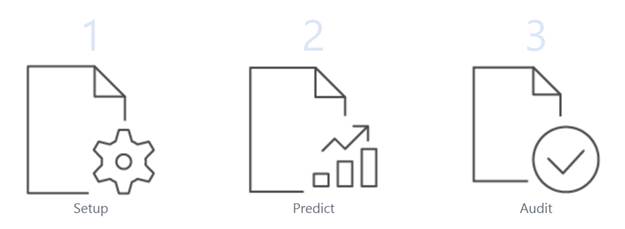
The Predictive Analytics homepage contains 3 main items.
- Setup – to configure predictive models, such as data sources and model length.
- Predict – to run your predictive models against a pre-configured cube-view.
- Audit – to analyze the executed models.
Setup: Configuring Predictive Models
Install the OneStream Data Science Package & Create a Predictive Model Template:
Install the Python Library: Copy the pre-configured OneStream Data Science Package folder to a server or shared drive. This folder contains the necessary Python functionality for Predictive Analytics. If you're using OneStream Cloud, the support team will handle this step for you.
Create Predictive Model Template: Navigate to the Setup tab and click "Add" to create a new model template. Key fields to configure include:
- Reference Period: The last period of your historical dataset.
- Historical Range: Recommended range of 18 to 48 months.
- Default Model: Choose a specific model or allow OneStream to auto-select the best one based on your data.
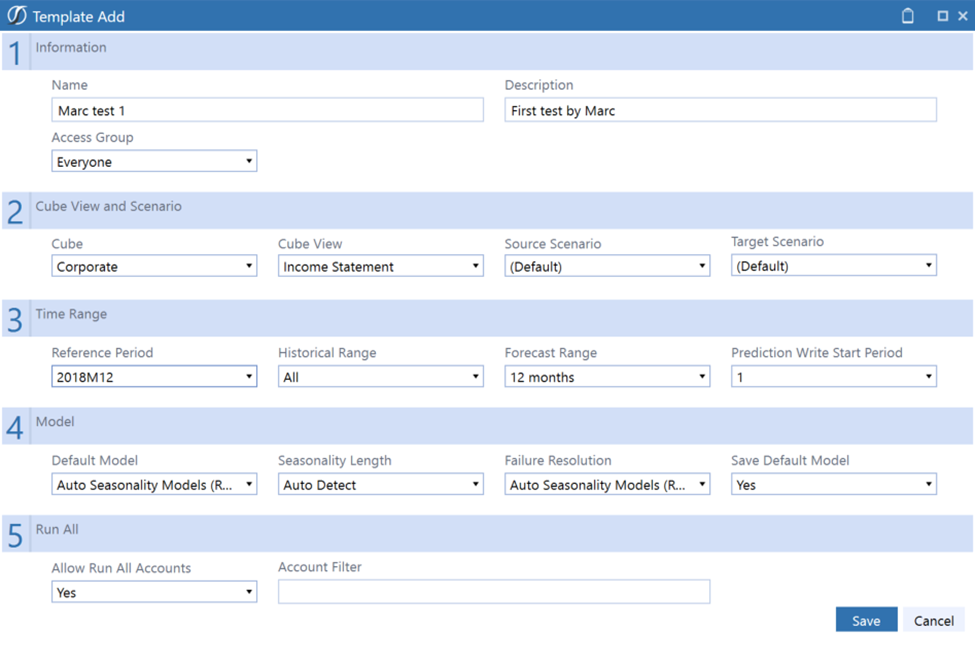
Configure Cube View for Data Source:
Ensure you have the correct user access rights to the Cube View, allowing you to modify data and set access permissions within the Cube View itself. Only one Cube View can be used as the data source for predictive analytics at a time.
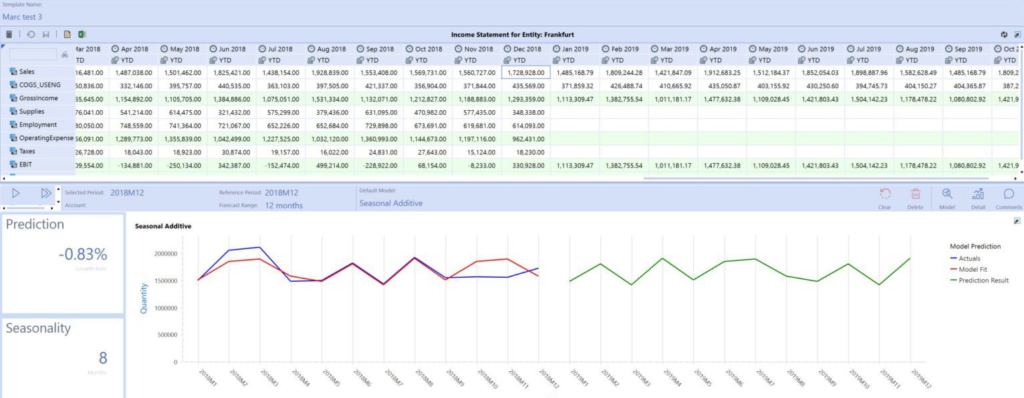
Predict: Running Your Predictive Models
Select, Choose, and Run:
- In the Predict tab, select the template you created during Setup.
- Choose a data cell in the Cube View that has the template available (ensure you’re in the correct period, e.g., 2018M12).
- Click the play button to run the predictive model for the selected cell, or use Calculate All to execute the model across the entire Cube View (note that running all cells may take longer).
View Results:
- Once execution is complete, the dashboard displays both the original and predicted data.
- Review the results, clear them if needed, and add comments or adjust the model as necessary.
Audit: Analyzing Executed Models
Track Model Execution and Review Results:
- Use the Audit tab to view details of executed models, including who ran them, which accounts were used, and any comments made. Analyze the best-matching models and forecast data to ensure the results align with expectations. Only the best results are stored in your Cube View, so it’s important to review for any discrepancies.
Data and Execution Considerations:
- For accurate forecasting, ensure a minimum of 18 months of historical data, with 24 months for seasonal data and 48 months for ARIMA models. Be aware that complex models, especially on larger datasets, may take significant time to run, so allow for ample processing time.
With OneStream Predictive Analytics, users can quickly set up predictive models, run them against Cube Views, and analyze the results for deeper business insights. The tool allows for automated model selection, requires minimal statistical knowledge, and provides easy-to-follow steps for executing and auditing predictive models.
Conclusion
Leveraging direct connections and predictive analytics in OneStream can significantly enhance the accuracy and efficiency of financial decision-making. By seamlessly integrating data and harnessing advanced analytics, organizations can gain deeper insights, streamline processes, and stay ahead of the curve in an increasingly data-driven world. Explore OneStream's official page on Predictive Analytics and discover more insightful OneStream blogs here.
The future of OneStream lies in expanding its predictive capabilities and further streamlining data integrations across diverse platforms. As businesses continue to embrace advanced analytics, OneStream’s evolving features will drive even greater automation and data-driven decision-making.