In the realm of digital media, the choice of video codec can significantly impact the quality andefficiency of video streaming and storage. H.264 and H.265 (also known as AVC and HEVC,respectively) are two of the most commonly used video codecs, each with its advantages anddrawbacks. In this blog, we’ll explore how to analyze these codecs performance using a custombuiltvideo comparison application developed with Python and PyQt5. By the end of this article,you’ll understand the workings of our application, how to evaluate video quality, and thesignificance of metrics like PSNR, SSIM, and VMAF.
Understanding Video Codecs
Before diving into the code, let’s briefly discuss what H.264 and H.265 are:/
- h.264: Also known as AVC (Advanced Video Coding), H.264 is a widely adopted video compression standard. It strikes a good balance between video quality and file size, making it ideal for a variety of applications, including streaming services to broadcast television. H.264 efficiently encodes high-definition video, allowing for smooth playback even at lower bit rates.
- h.264: Also known as AVC (Advanced Video Coding), H.264 is a widely adopted video compression standard. It strikes a good balance between video quality and file size, making it ideal for a variety of applications, including streaming services to broadcast television. H.264 efficiently encodes high-definition video, allowing for smooth playback even at lower bit rates.
The need for Analysis
As video streaming becomes more prevalent, it’s crucial to analyze how these codecs perform under various conditions. Our application provides a platform to compare two video files—one encoded with H.264 and the other with H.265—against a reference video. It analyzes video quality metrics such as VMAF, PSNR, and SSIM.
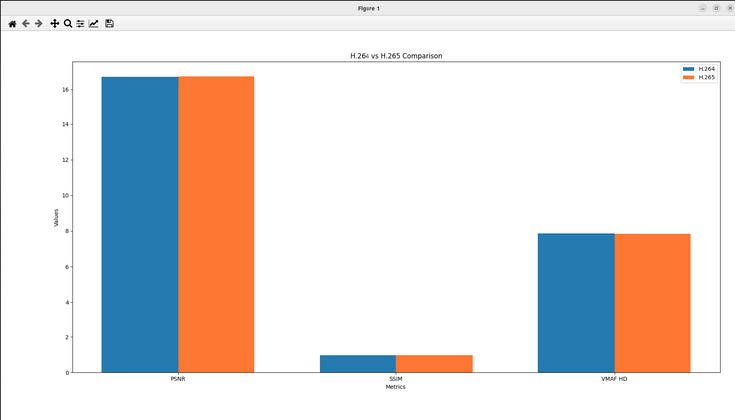
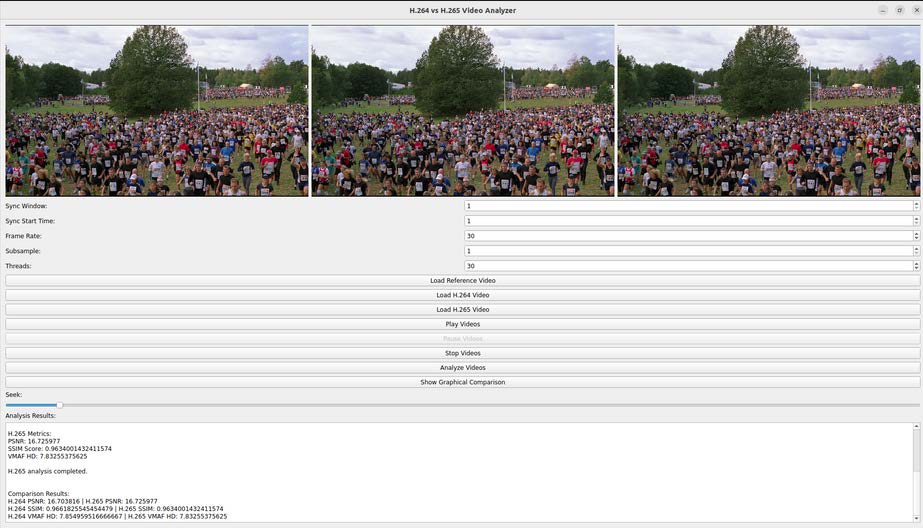
The results are visualized through a graphical comparison, with the system leveraging FFmpeg for video processing, Python for analysis, and a PyQt5 interface for user interaction. The tool helps users assess and compare the performance of H.264 and H.265 codecs in real-time video streaming.
Project Overview
This project aims to create a real-time streaming analyzer :
To create our video comparison application, we utilized the PyQt5 framework, which allows for creating powerful GUI applications in Python. The project structure is straightforward, primarily involving two components: the GUI and the analysis logic.
Accepts two video files (one H.264 and one H.265).
Analyzes various parameters such as VMAF, PSNR and SSIM
Displays the results graphically.
Setting Up the Environment
Installing FFmpeg
To install FFmpeg on your system, follow the instructions specific to your operating system:
bash
For Ubuntu
sudo apt update
sudo apt install ffmpeg
Installing Required Python Libraries
Make sure you have Python and pip installed, then run:
bash
pip install PyQt5 matplotlib
You’ll also need FFmpeg and Python for executing our analysis scripts.
Tools and Technologies Used
Python: The core language for backend computation.
PyQt5: Used to create the graphical user interface.
FFmpeg: A powerful tool for video processing, used here for resizing and ensuring video
compatibility.
Matplotlib: To visualize comparison results in the form of charts.
Step 1: Setting Up the Front-End with PyQt5
The front-end is built using PyQt5, allowing users to interact with the video analyzer easily.
Key Features of the Front-End
Video Selection: Users will select both H.264 and H.265 videos, along with a reference video.
Result Display: Numerical results for PSNR, SSIM, and VMAF.
Graphical Comparison: Shows the comparison result in the form of bar graph
Here’s a basic setup for the PyQt5 interface:
python
class StreamingAnalyzerApp(QWidget):
 def __init__(self):
  super().__init__()
  self.initUI()
  self.process = QProcess(self)
  self.process.readyReadStandardOutput.connect(self.handle_stdout)
  self.process.readyReadStandardError.connect(self.handle_stderr)
  self.process.finished.connect(self.process_finished)

 def initUI(self):
  # Setup for buttons, labels, and file selection dialogs
  self.h264_label = QLabel('Select H.264 Video:')
  self.h265_label = QLabel('Select H.265 Video:')
  self.reference_label = QLabel('Select Reference Video:')

  # Create file input fields and a button to start analysis
  self.h264_input = QLineEdit(self)
  self.h265_input = QLineEdit(self)
  self.reference_input = QLineEdit(self)
  self.compare_button = QPushButton('Compare Videos', self)

  # Set up the layout and positioning
  layout = QVBoxLayout()
  layout.addWidget(self.h264_label)
  layout.addWidget(self.h264_input)
  layout.addWidget(self.h265_label)
  layout.addWidget(self.h265_input)
  layout.addWidget(self.reference_label)
  layout.addWidget(self.reference_input)
  layout.addWidget(self.compare_button)
  self.setLayout(layout)

  self.compare_button.clicked.connect(self.compare_videos)
  self.setWindowTitle('H.264 vs. H.265 Analyzer')
  self.show()
Code Explanation:
initUI(): This method initializes the UI components, setting up the labels for video selection and input fields for users to select the H.264, H.265, and reference video files. The "Compare Videos" button triggers the analysis.
self.process: This manages the backend process that runs the FFmpeg commands for video processing and analysis.
Once the "Compare Videos" button is clicked, it triggers the backend analysis
Step 2: Creating the Backend Logic
The core of the comparison is done in the backend using the Vmaf_calculator.py script to extract video data and Python to compute the quality metrics.
python
def analyze_videos(self):
params = {'sync_window': self.sync_window_input.value(), 'frame_rate':
self.frame_rate_input.value(), 'threads': self.threads_input.value()}
self.thread_h264 = AnalysisThread(self.ref_video_path, self.video_path_1, "H.264", params)
self.thread_h265 = AnalysisThread(self.ref_video_path, self.video_path_2, "H.265", params)
self.thread_h264.start()
def display_comparison(self):
if "H.264" in self.results and "H.265" in self.results:
h264 = self.results["H.264"]
h265 = self.results["H.265"]
# Display comparison results
self.results_box.append("\nComparison Results:")
self.results_box.append(f"H.264 PSNR: {h264['psnr']} | H.265 PSNR: {h265['psnr']}")
self.results_box.append(f"H.264 SSIM: {h264['ssim']} | H.265 SSIM: {h265['ssim']}")
self.results_box.append(f"H.264 VMAF HD: {h264['vmaf']} | H.265 VMAF HD:
{h265['vmaf']}")
# Enable the plot button
self.plot_button.setEnabled(True)Code Explanation:
The analyze_videos function constructs and executes two separate FFmpeg commands to compare H.264 and H.265 videos against the reference video using the PSNR metric. It uses subprocess.run to run the commands, which save the PSNR results to h264_psnr.log and h265_psnr.log for further analysis.
The display_comparison function checks if the analysis results for both H.264 and H.265 videos are available. Once both are present, it retrieves the metrics—PSNR, SSIM, and VMAF—from the results, displays them in the results box for comparison, and enables the plot button, allowing the user to visualize the comparison between the two codecs.
Step 3 : Combining Front-End and Back-End
def calculate_metrics(self, ref_video_path, enc_video_path):
 try:
 cmd = [
  'python3', 'Vmaf_calculator.py',
  '-d', enc_video_path,
  '-r', ref_video_path,
  '-sw', str(self.params['sync_window']),
  '-ss', str(self.params['sync_start_time']),
  '-fps', str(self.params['frame_rate']),
  '-subsample', str(self.params['subsample']),
  '-threads', str(self.params['threads'])
 ]

 print("Executing Command:", ' '.join(cmd)) # Debugging line
 process = subprocess.Popen(cmd, stdout=subprocess.PIPE, stderr=subprocess.PIPE,
text=True)
Code Explanation:
The calculate_metrics method defines a procedure to analyze video metrics by executing anexternal script (Vmaf_calculator.py) using a subprocess. It takes two parameters: ref_video_pathfor the original reference video and enc_video_path for the encoded video. Within a try block, itconstructs a command list containing the necessary arguments for executing the script,including options for the encoded video path, reference video path, synchronization window,sync start time, frame rate, subsampling factor, and the number of threads to use. Thiscommand list is then prepared for execution, allowing for the assessment of video qualitymetrics based on the provided inputs.
Step 4: Running the Application
Once the front-end and backend are integrated, running the application is straightforward. Users load the videos, click "Analyze," and view the results.
bash
python3 video_analyzer.py
After the analysis is complete, the results are displayed in the GUI. Users can view detailed scores for each video codec and generate a graphical comparison.
Step 5: Interpreting the Results
The results of the analysis show key video quality metrics:
- PSNR (Peak Signal-to-Noise Ratio): Higher PSNR indicates less distortion and better quality.
- SSIM (Structural Similarity Index): A higher SSIM score means the video retains more structural details and resembles the original video better.
- VMAF (Video Multimethod Assessment Fusion): A higher VMAF score reflects better visual quality as perceived by viewers.
Comparing these metrics for H.264 and H.265 helps determine which codec delivers better
quality at similar bitrates. H.265 typically offers better compression efficiency, while H.264 may
require more bitrate to maintain the same level of quality.


Step 6: Graphical Comparison
Once both analyses are completed, the results for PSNR, SSIM, and VMAF are displayed side by side for H.264 and H.265 video files, facilitating easy comparison. Additionally, a bar chart is generated to visually represent these metrics, allowing users to quickly assess the differences in video quality between the two codecs.
python
def plot_comparison(self):
 h264_values = [h264['psnr'], h264['ssim'], float(h264['vmaf'])]
 h265_values = [h265['psnr'], h265['ssim'], float(h265['vmaf'])]
 metrics = ['PSNR', 'SSIM', 'VMAF HD']

 fig, ax = plt.subplots()
 ax.bar(metrics, h264_values, width=0.4, label='H.264')
 ax.bar(metrics, h265_values, width=0.4, label='H.265')
 plt.show()
Code Explanation
plot_comparison(): This function generates a graph comparing the VMAF scores of the two
videos. You can similarly create graphs for PSNR and SSIM to give a visual representation of how
the codecs perform across different frames.
User Interface: A Closer Look at the Video Analyzer UI"

Conclusion
Building this H.264 vs. H.265 video analyzer provided a hands-on opportunity to explore video processing and GUI development using PyQt5. By analyzing the quality metrics, you can make informed decisions about which codec to use for your video projects.
By following this guide, you will gain a deeper understanding of how to analyze video files encoded with H.264 and H.265. You’ll learn to integrate a graphical front-end with Python backend logic and how to create tools for video quality assessment. This project provides valuable experience in managing software integrations and video analysis techniques.
With the knowledge gained, you can extend this project to include more features, such as batch processing or additional video quality metrics, further enhancing its utility in real-world scenarios. Whether you're looking to improve your coding skills or create practical tools for video analysis, this project serves as a solid foundation for your future endeavors.

